 The Discus | Discus Fish Care and Breeding Guide
Automatic Water Changes for Discus: Safe Setup Guide
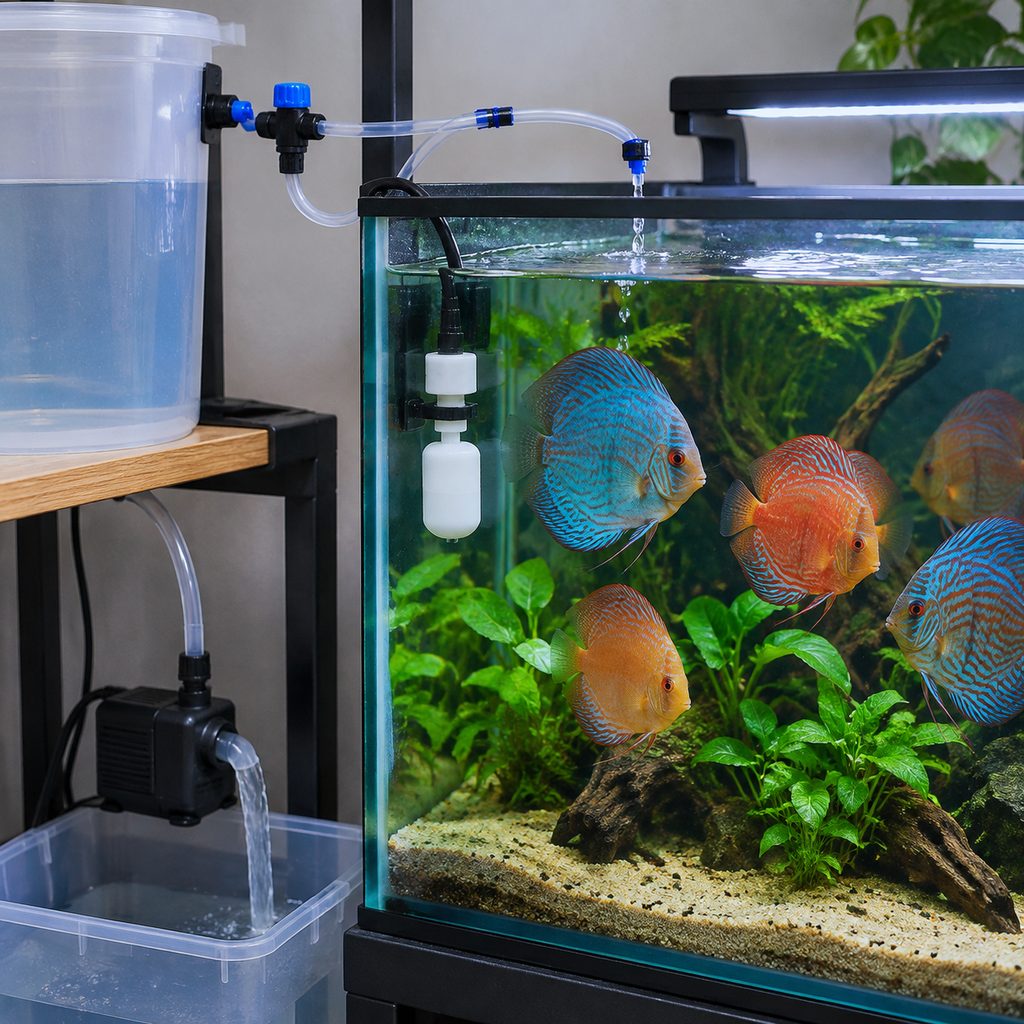
Frequent water changes are part of keeping discus, especially when fish are growing quickly. Automation can reduce the bucket routine, but it does not remove the need to measure water, treat incoming water, and inspect the equipment. A stuck valve or untreated tap supply can create a bigger problem than the chore the system was meant to solve.
Set the water-change target before buying parts
For adult discus, the care guide uses a weekly change of 30–50%. For juveniles, it gives at least 30% daily or every other day. Let V stand for the aquarium's actual water volume, not its advertised tank capacity. For adults, a continuous-flow starting estimate is 0.30V to 0.50V over seven days. That is the weekly target divided across the week.
For juveniles, a daily schedule starts at 0.30V or more per day. If changing every other day, 30% of V every two days averages at least 0.15V per day. These calculations help size a starting flow; continuous exchange is not identical to replacing a batch of water all at once. Measure both the inlet and drain with a container and a clock, then adjust based on water quality and fish condition. Log the real tank volume, target, measured flow, and results.
What U.S. water-change products actually offer
U.S. shopping listings use terms such as “bucket-free water change kit,” “gravel vacuum,” “siphon,” and “drain and fill” hose. An October 2026 Amazon search showed hygger kits with 33-foot hoses at $39.99 and 25-foot hoses at $36.99; a Laifoo vacuum/gravel cleaner with a 25-foot siphon was listed at $29.99. These are manual drain-and-fill or siphon products, not proof of a finished unattended system.
The same search showed hygger quick water-change pumps at $18.99 for a listed 215-GPH model and $24.69 for a 400-GPH model. A pump or long hose can make routine water changes easier, but it does not automatically provide safe continuous filling, metered dechlorination, overflow control, or a tested unattended installation. No complete system with verified U.S. availability and price was confirmed in that search. Treat marketplace prices as snapshots; availability can change.
A DIY arrangement may include a timer, solenoid valves, drip tubing or a drip bucket, water treatment, and separate safeguards. The Japanese cost estimate is not a U.S. price quote, and a U.S. completed-system cost was not verified. Price parts only after you have designed the plumbing and treatment method.
Treat incoming water and prevent a flood
First check your municipal water provider's information for chlorine and chloramine. Choose a conditioner rated for the disinfectant used and follow its label for dosage and treatment capacity. Adding a little conditioner to the aquarium now and then may not treat all of a continuous incoming supply. The more controllable approach is to prepare the required water in a reservoir, treat it, and bring it close to tank temperature before delivery. A direct-to-tank setup needs a treatment method rated for continuous flow and an observed, measured dose.
Keep aquarium water from siphoning back into household plumbing. An air gap between the supply outlet and aquarium water is one part of a safer layout; do not rely on a check valve alone. Plumbing and backflow requirements depend on the installation and jurisdiction, so check the rules that apply to your home and use a qualified plumber where needed. Keep a hand-operated shutoff accessible.
A timer or solenoid can fail. Limit the inlet flow, add an independent high-water cutoff, and provide a separate overflow drain. An overflow pipe by itself will not protect you from a clogged drain or a disconnected hose. Put the system where leaks are visible, consider a leak alarm, and inspect it while operating. Test failure modes with someone present before trusting it while away.
Keep temperature steady and inspect the system
Small, continuous additions can reduce abrupt changes compared with a large single refill, but only when the new water is suitable and close to tank temperature. Discus may react to a change of 0.9–1.8°F (0.5–1°C). In winter, check incoming water temperature and keep the flow within what the aquarium heater can maintain. Slow or pause the system if the temperature begins to drift.
For a trip of about one week, do a water change before leaving, use a feeder set for one or two small feedings a day, and keep lighting and heating on their usual timer. Run an automatic exchange at a conservative rate only after confirming the whole system works. Ask a trusted person to check the aquarium and plumbing during longer absences. Inspect temperature, water quality, valves, and drain flow about weekly even when you are home.
FAQ
Can an automatic water-change system run without supervision?
It should not be treated as maintenance-free. Timers, valves, and drains can fail. Monitor water and fish, test the setup, and inspect the equipment regularly; arrange a person to check it if you will be away.
Are bucket-free kits automatic?
Most listings found in the U.S. search described hoses, siphons, gravel vacuums, or pumps for a keeper-operated change. They can reduce lifting and carrying, but do not assume they provide unattended, continuous exchange.
Can I run a drip system in winter?
Yes, if the incoming water is close enough to tank temperature and the heater can handle the added flow. Measure water temperature while the system runs and reduce the rate if it drifts.
‹ Back to all articles